处理图像的常用方法
矩阵掩膜操作
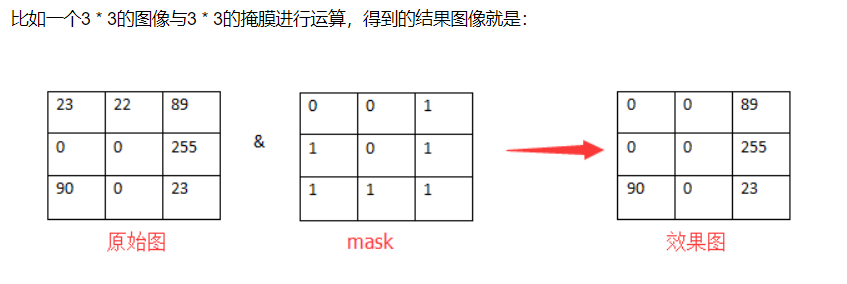
所谓掩膜其实就是一个矩阵,然后根据这个矩阵重新计算图片中像素的值。掩膜(mask也被称为kernel)
 image
image
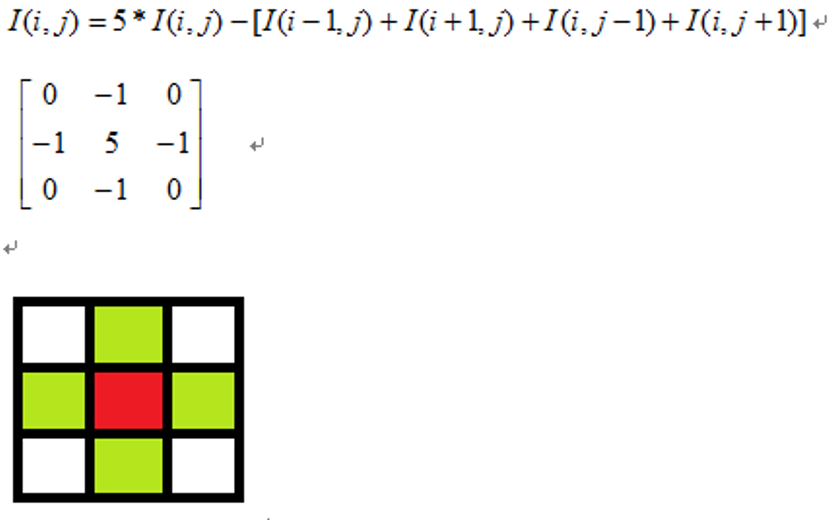
这里,我们用掩膜来提高图像对比度。用到的掩膜是:
 image
image
红色是中心像素,从上到下,从左到右对每个像素做同样的处理操作,得到最终结果就是对比度提高之后的输出图像Mat对象。
使用方法如下:
定义掩膜:Mat kernel = (Mat_
filter2D( src, dst, src.depth(), kernel );其中src与dst是Mat类型变量、src.depth表示位图深度,有32、24、8等。
#include <opencv2/opencv.hpp>
#include <iostream>
#include <math.h>

using namespace cv;
using namespace std;

int main(int argc, char** argv) {
	Mat src;
//	src = imread("D:/1.jpg");
	src = imread("D:/WireRope/change.jpg");
	if (!src.data) {
		printf("could not load image...\n");
		return -1;
	}
	namedWindow("input image", CV_WINDOW_AUTOSIZE);
	imshow("input image", src);

	Mat dst;
	dst = Mat(src.size(), src.type());

	Mat kernal = (Mat_<char>(3, 3) << 0, -1, 0,
									 -1, 5, -1,
									  0, -1, 0);
	filter2D(src, dst, src.depth(), kernal);
	imshow("contract image demo", dst);
	imwrite("D:/WireRope/contrast_change.jpg", dst);

	waitKey(0);
	return 0;
}
用这种方法就提高了图像的对比度。我们给filter2D什么样的掩膜,他就会替你执行什么样的操作。
像素范围处理saturate_cast
- saturate_cast
(-100),返回 0。 - saturate_cast
(288),返回255 - saturate_cast
(100),返回100
这个函数的功能是确保RGB值得范围在0~255之间
基本阈值操作
- 阈值二值化(threshold binary)
蓝色表示阈值线,红色表示像素的分布情况。需要注意的是这里的阈值操作以及接下来的阈值操作对应的都是灰度图像而言的。
 image
image
- 阈值反二值化(threshold binary Inverted)
 image
image
- 截断 (truncate)
 image
image
- 阈值取零 (threshold to zero)
 image
image
- 阈值反取零 (threshold to zero inverted)
 image
image
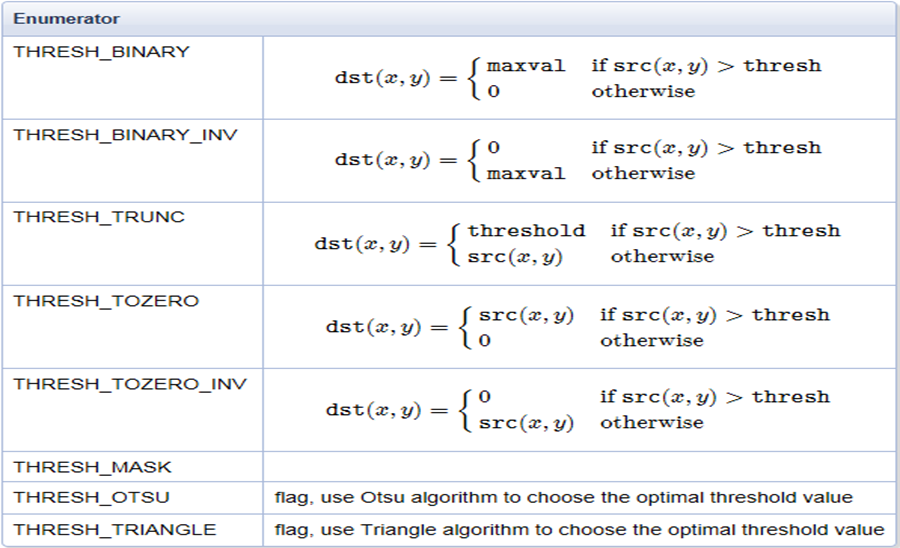
这里给出指令名称:
 image
image
要知道的是,这五个值应该被宏定义过,实际上其背后分别是数字0-4,所以写成数字0-4也是可以的。
下面是阈值二值化的代码:
#include <opencv2/opencv.hpp>
#include <iostream>
#include <math.h>

using namespace cv;

Mat src, dst, gray_src;
int threshold_value = 127; //像素值是0-255,取中间值就是127
int threshold_max = 255;
const char* output_title = "binary image";

void Threshold_Demo(int, void*);

int main(int argc, char** argv) {
	src = imread("D:/2.jpg");
	if (!src.data) {
		printf("could not load image...\n");
		return -1;
	}
	namedWindow("input image", CV_WINDOW_AUTOSIZE);
	namedWindow(output_title, CV_WINDOW_AUTOSIZE);
	imshow("input image", src);


	createTrackbar("Threshold Value", output_title, &threshold_value, threshold_max, Threshold_Demo); //创建一个拖动条
	Threshold_Demo(0, 0);

	waitKey(0);
	return 0;
}


void Threshold_Demo(int, void*) {
	cvtColor(src, gray_src, CV_BGR2GRAY);
	threshold(gray_src, dst, threshold_value, threshold_max, THRESH_TOZERO_INV);  //更改这里的值,就可以实现5种阈值操作转换
	imshow(output_title, dst);
}
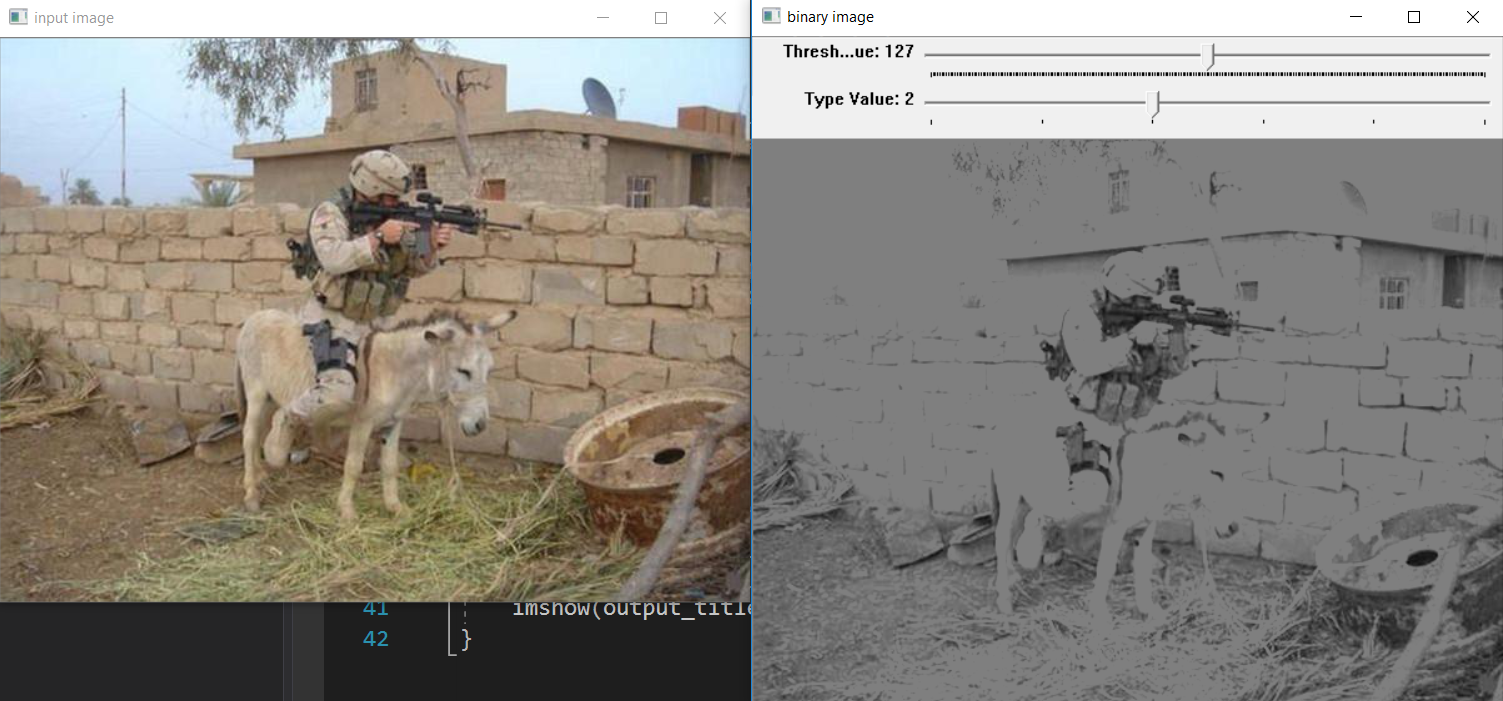
下面是5个值一起创建拖动条的效果:
#include <opencv2/opencv.hpp>
#include <iostream>
#include <math.h>

using namespace cv;

Mat src, dst, gray_src;
int threshold_value = 127; //像素值是0-255,取中间值就是127
int threshold_max = 255;

int type_value = 2;
int type_max = 4;   //定义5种操作,5种操作所对应的实际值分别是0-4

const char* output_title = "binary image";

void Threshold_Demo(int, void*);

int main(int argc, char** argv) {
	src = imread("D:/test.jpg");
	if (!src.data) {
		printf("could not load image...\n");
		return -1;
	}
	namedWindow("input image", CV_WINDOW_AUTOSIZE);
	namedWindow(output_title, CV_WINDOW_AUTOSIZE);
	imshow("input image", src);


	createTrackbar("Threshold Value", output_title, &threshold_value, threshold_max, Threshold_Demo); //创建一个拖动条
	createTrackbar("Type Value", output_title, &type_value, type_max, Threshold_Demo); //创建一个拖动条
	Threshold_Demo(0, 0);

	waitKey(0);
	return 0;
}


void Threshold_Demo(int, void*) {
	cvtColor(src, gray_src, CV_BGR2GRAY);
	threshold(gray_src, dst, threshold_value, threshold_max, type_value);  //更改这里的值,就可以实现5种阈值操作转换
	imshow(output_title, dst);
}
 image
image
- 自动计算阈值
实现方法是THRESH_OTSU和THRESH_TRIANGLE
这两种方法可以用于自动计算阈值,背后都有一些对应的数学原理。
threshold(gray_src, dst, threshold_value, threshold_max, THRESH_OTSU | type_value); //更改这里的值,就可以实现5种阈值操作转换
更改这里就可以实现自动求阈值。